DIY: EG Door insert type R! PICS PICS!!!
 06-Feb-2005, 01:36 AM
#1
Registered User
Thread Starter
Join Date: Jan 2005
Location: London
Posts: 271
DIY: EG Door insert type R! PICS PICS!!!
Well i decided to do a project so i figured i could do a write up since i appreciate ppl who do theirs! So heres goes nothing!
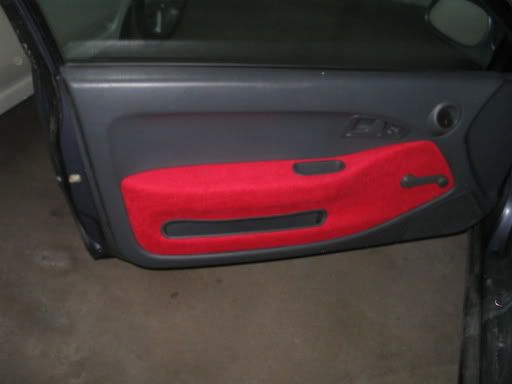
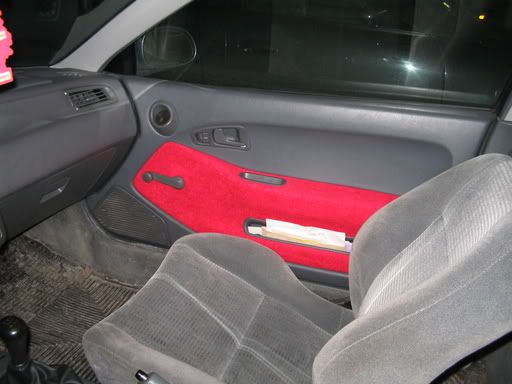
Well, what I did to my panels first of all i re covered the side panels in red for a more of a jdm/type r look! I think it looks awesome! to each his own tho!
First you will need some tools:
- Knife/scissors
- Adhesive spray (available @ any hardware store)
- Red tweed fabric about 1 yard by 1 yard!
- Lighter
- a friend (optional)
- about 4 hours of time
First off start off by taking your car panels off and bringing them to your workspace!

Then, what your going to need to do is melt the back pieces so that you can pop the plastic through! be careful you dont burn through the vinyl as it is very easy to do so!

After you do that, cut and measure out how much fabric you will be needing, its easier if you start from the top and work your way down to the easier spots therefore you have a little more play with the material so you can pull tight/adjust the fabric at the bottom!!

Once you have the surface covered and where you want it spray your adhesive on the surface you will be applying it too and also the fabric as this will make it a permanent glue! MAKE SURE YOU TAKE YOUR TIME AND DO IT RIGHT OR YOU WILL MESS UP! DO THIS SECTION BY SECTION! Do the corners and the hard areas very slowly therefore its eaiser to do since your working with a smaller amount of fabric!

Once you have your fabric lair all around cut out the holes for all the pockets such as the lower one, the pocket close to the door handle! Cut through the middle of this so you have enough to wrap you fabric around the edges this will help once your ready to reinstall the panel do the door panel!!
After you've done that, take a knife or something round and poke the holes out where the melted clips went and prepare the unit for reinstallment!

after youve poked those holes out this is where it becomes a little bit tricky, what you can do is either put the melted plastic back through the door panel and melt it back overtop which is very difficult or you can use screws and drive them through the melted plastic which is what i did! Much more stable and secure! It helps also if you wrap the fabric over and drive the screw through that also as it will be pulled even if the adhesive does come loose (which it shouldnt if done properly!)

Once youve completed these steps you should have something that looks like this!!

Good luck with your project and hopefully this will help out a few of you guys! Thanks for looking and keep it clean!!
- 94Civic_R (Jeff)
Well, what I did to my panels first of all i re covered the side panels in red for a more of a jdm/type r look! I think it looks awesome! to each his own tho!
First you will need some tools:
- Knife/scissors
- Adhesive spray (available @ any hardware store)
- Red tweed fabric about 1 yard by 1 yard!
- Lighter
- a friend (optional)
- about 4 hours of time
First off start off by taking your car panels off and bringing them to your workspace!
Then, what your going to need to do is melt the back pieces so that you can pop the plastic through! be careful you dont burn through the vinyl as it is very easy to do so!
After you do that, cut and measure out how much fabric you will be needing, its easier if you start from the top and work your way down to the easier spots therefore you have a little more play with the material so you can pull tight/adjust the fabric at the bottom!!
Once you have the surface covered and where you want it spray your adhesive on the surface you will be applying it too and also the fabric as this will make it a permanent glue! MAKE SURE YOU TAKE YOUR TIME AND DO IT RIGHT OR YOU WILL MESS UP! DO THIS SECTION BY SECTION! Do the corners and the hard areas very slowly therefore its eaiser to do since your working with a smaller amount of fabric!
Once you have your fabric lair all around cut out the holes for all the pockets such as the lower one, the pocket close to the door handle! Cut through the middle of this so you have enough to wrap you fabric around the edges this will help once your ready to reinstall the panel do the door panel!!
After you've done that, take a knife or something round and poke the holes out where the melted clips went and prepare the unit for reinstallment!
after youve poked those holes out this is where it becomes a little bit tricky, what you can do is either put the melted plastic back through the door panel and melt it back overtop which is very difficult or you can use screws and drive them through the melted plastic which is what i did! Much more stable and secure! It helps also if you wrap the fabric over and drive the screw through that also as it will be pulled even if the adhesive does come loose (which it shouldnt if done properly!)
Once youve completed these steps you should have something that looks like this!!
Good luck with your project and hopefully this will help out a few of you guys! Thanks for looking and keep it clean!!
- 94Civic_R (Jeff)
 06-Feb-2005, 01:42 AM
#2
Registered User
Join Date: Feb 2005
Location: Durham Region
Posts: 2,548
not bad...
i think the colour would clash to much with the stock interior but its still a good diy...
i think the colour would clash to much with the stock interior but its still a good diy...
06-Feb-2005, 04:05 AM
#3
Senior Member

Join Date: Feb 2003
Location: Scarborough and Mississauga
Posts: 7,065
Good write-up
Couple things I would do differently would be this
Dont bother burning the plastic welds, cut them off with a knife or a dremel. Also Make sure you spray the adhesive everywhere on the material and the panel. I would also start from the middle of hte panel and work your way to the outside edges. For pockets and such wait for the glue to set for about 30 minutes and then be very careful and cut an x in the material. Then fold the edges to the other side and you can glue them to the backside. Another trick would be to slightly burn the cut edges so theres no chance of the material ripping or fraying later on. For re-attaching ur best to use screws with washers bigger than the holes in the panel, this will give u a very secure mount and u wont have to go back to fix it later.
06-Feb-2005, 08:07 AM
#4
Registered User
Join Date: Mar 2004
Posts: 7,745
Great writeup man  People ahve been pm'ing me asking how i didi mine and now i can just link em to this thread
People ahve been pm'ing me asking how i didi mine and now i can just link em to this thread
06-Feb-2005, 12:16 PM
#5
Registered User
Thread Starter
Join Date: Jan 2005
Location: London
Posts: 271
thanks guys. the key is to take ur time, and you can use those different steps! Mine worked for me so w/e is best for you! Good luck with your DIY!
06-Feb-2005, 12:30 PM
#6
Senior Member
Join Date: Aug 2003
Posts: 15,801
Great writeup!
Looks good too!
Looks good too!

Thread
Thread Starter
Forum
Replies
Last Post
imported_chinook
Honda Civic Performance - JDM Discussion
11
09-Jun-2006 04:45 PM
imported_Acura_mm
Honda Civic (+ other) Parts/Accessories for Sale or Trade
3
29-Jan-2006 10:31 PM
imported_doggy69247
Honda Civic (+ other) Parts/Accessories for Sale or Trade
3
08-Mar-2005 07:00 PM
imported_loudsubz
Honda Civic Performance - JDM Discussion
14
06-Jul-2004 10:07 AM


