Painting My Valve Cover
 28-Aug-2005, 04:26 PM
#1
Registered User
Thread Starter
Join Date: Aug 2005
Location: London, On
Posts: 229
Painting My Valve Cover
Hello, this is my first post at the TCC forrums  .
.
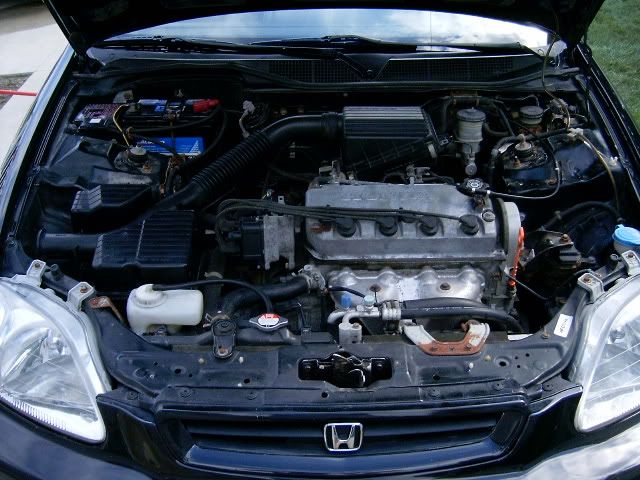
I am wanting to paint my valve cover on my 96 civic cx and am wondering what the steps are in doing this.
I have the painting steps covered, but am wondering about taking the cover itself off. Is there anything special I have to do when taking it off or replacing it? I've heard things about a seal that needs to be replaced or something. Also, do the spark plugs need to be removed, or do just the covers come off?
If anyone could give me a list of steps to take to remove and then replace my engine's valve cover, I would greatly appreciate it. Thank you!
.I am wanting to paint my valve cover on my 96 civic cx and am wondering what the steps are in doing this.
I have the painting steps covered, but am wondering about taking the cover itself off. Is there anything special I have to do when taking it off or replacing it? I've heard things about a seal that needs to be replaced or something. Also, do the spark plugs need to be removed, or do just the covers come off?
If anyone could give me a list of steps to take to remove and then replace my engine's valve cover, I would greatly appreciate it. Thank you!
 28-Aug-2005, 04:44 PM
#2
Registered User
Thread Starter
Join Date: Aug 2005
Location: London, On
Posts: 229
I found this thread, but does anyone have pictures or detailed info to compliment which part has to be "siliconed"? This will be my first time doing this.
http://www.honda-acura.net/forums/ar...p/t-76048.html
http://www.honda-acura.net/forums/ar...p/t-76048.html
 28-Aug-2005, 09:36 PM
#4


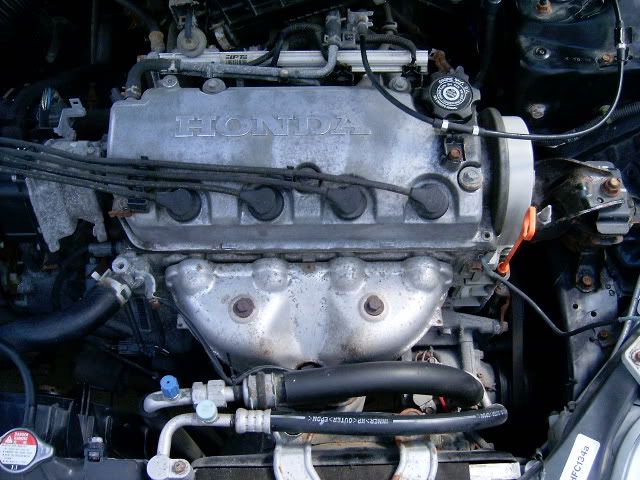
hey bro, the 'silicone' part i assume means using Hondabond or Permatex ultra gray on the gasket when installing it. it's applied in the corners on each side of the cam hump. You'll see where the factory applied it, and you should apply it in the same spot.
28-Aug-2005, 10:12 PM
#5

I have a great link for you. pics and everything. The only thing is you need to register.. I suggest doing it tho, not only to check this DIY out but there are tons of other good ones.. register, log in and then click this link.
http://www.civicland.com/forums/inde...showtopic=3527
http://www.civicland.com/forums/inde...showtopic=3527
28-Aug-2005, 10:17 PM
#6
Registered User
Join Date: Mar 2005
Location: Toronto
Posts: 1,498
pull the plug wires out, take off the bolts i've circled in yellow and remove the valve cover. if it sticks or does not come off, gently pry with a screw driver...gently.
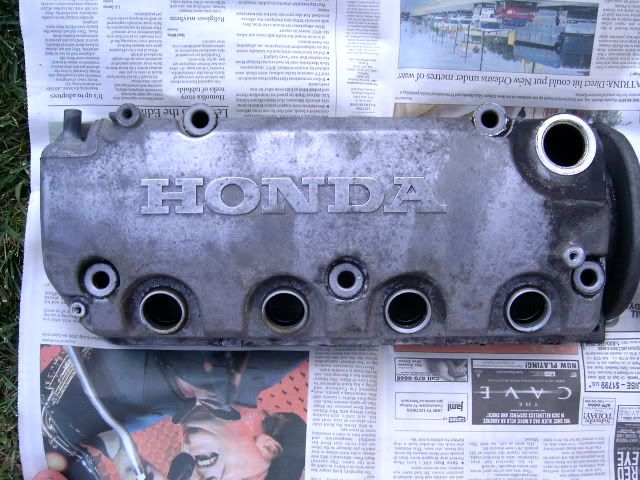
wash it with an sos pad or sand it briefly to get the parts that are very rough smooth enough for paint
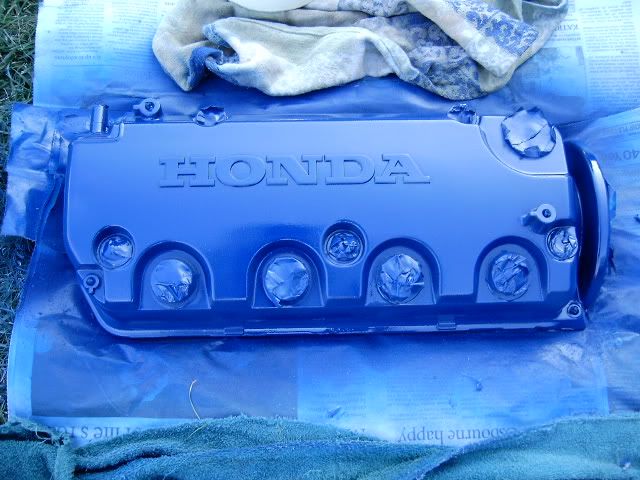
then paint with high-heat of your choice. i did mine red, but it will be re-done cast iron silver soon.

you'd only need to replace the valve cover seal if its broken, otherwise just re-use
wash it with an sos pad or sand it briefly to get the parts that are very rough smooth enough for paint
then paint with high-heat of your choice. i did mine red, but it will be re-done cast iron silver soon.
you'd only need to replace the valve cover seal if its broken, otherwise just re-use
28-Aug-2005, 10:43 PM
#7
Registered User
Thread Starter
Join Date: Aug 2005
Location: London, On
Posts: 229
Thanks so much for the replies guys, they have really helped. I have never done this so I was pretty hesitant at first, but after reading a lot more about it, I feel much more comfortable.
I will post some pics when I get to it.
Thanks again.
Edit:
That article at CivicLand is awesome! Exactly what I needed.
I will post some pics when I get to it.
Thanks again.
Edit:
That article at CivicLand is awesome! Exactly what I needed.
29-Aug-2005, 04:53 AM
#11
Registered User
Join Date: Aug 2005
Location: Belgium
Posts: 449
i did the same last weekend, and also have to paint it , but my cover has been removed and taped off. you surtenly dont want any dirt in your valve room, so, clean it well, inside and out, romve allt he oil. When the cover is clean, tape all the holes and stuff off with paper tape, and then you can start painting. I sanded the thing off first before cleaning it, so it's smooth and silky flat. the holes on the side, those half *****, i covered them with a cover of a spraycan cut in two, each hole half of a cover, this will keep the paint out from the inside of the valve cover. from those 2 holes on the leftside of your cover.
29-Aug-2005, 03:10 PM
#12
Registered User
Thread Starter
Join Date: Aug 2005
Location: London, On
Posts: 229
I'm looking to start this project NOW  . I am just concerned about tightening the bolts on the cover. How tight do I have to put them back on? I don't want to snap anything and I don't have the proper tools so I have to do this by hand. Should they be hand-tight; a little more/less?
Thanks
. I am just concerned about tightening the bolts on the cover. How tight do I have to put them back on? I don't want to snap anything and I don't have the proper tools so I have to do this by hand. Should they be hand-tight; a little more/less?Thanks
29-Aug-2005, 03:41 PM
#13
Registered User
Thread Starter
Join Date: Aug 2005
Location: London, On
Posts: 229
Found this on google, but don't know how tight 18 lb-ft is...
IMPORTANT! Run up the six valve cover screws just finger tight, then gradually work a circle around the six screws 1/2 turn at a time. This will evenly draw down the cover, uniformly compressing the gaskets. Tighten to about 18 lb-ft of torque.
29-Aug-2005, 06:17 PM
#15
Registered User
Join Date: Mar 2005
Location: Toronto
Posts: 1,498
just read about no-proper tools, what are you using to remove this? borrow atleast and 10m wrench from a friend and then its easy to tighten it and not over do it. a 10mm socket/ratchet or a 10mm wrench will do it.
29-Aug-2005, 08:13 PM
#16
Registered User
Thread Starter
Join Date: Aug 2005
Location: London, On
Posts: 229
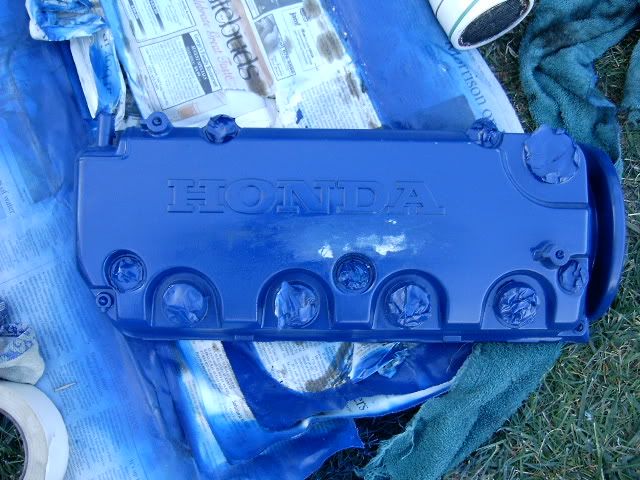
Alright fellas, I did it... sorta. Everything went as planned except my clear coat spray can farted and spilt droplets on the cover  . I tried to gently remove them, but that caused two little "holes."
I dealt with this and moved on. Unfortunately, next I made the 'in a rush' mistake and flipped it over (I thought it was dry) to dry the inside. When I flipped it back over, the newspaper stuck to it and it is a mess . I will post pics later on.
I replaced the cover and I think I will just sand the crappy part of the top and redo it while it is still on the engine (I will cover everything with bags and tape). The sides are perfectly fine, so I don't see a need to remove the whole cover again. Sigh, I'll keep everyone posted.
. I tried to gently remove them, but that caused two little "holes." I dealt with this and moved on. Unfortunately, next I made the 'in a rush' mistake and flipped it over (I thought it was dry) to dry the inside. When I flipped it back over, the newspaper stuck to it and it is a mess
. I will post pics later on. I replaced the cover and I think I will just sand the crappy part of the top and redo it while it is still on the engine (I will cover everything with bags and tape). The sides are perfectly fine, so I don't see a need to remove the whole cover again. Sigh, I'll keep everyone posted.
29-Aug-2005, 10:04 PM
#17
Registered User
Join Date: Mar 2005
Location: Toronto
Posts: 1,498
you didn't paint the inside did ya? "flipped it over to dry"
to fix the newspaper and blemishes, go buy a spray can of paint stripper and rubber gloves at home hardware, etc. it will peel the paint, then re-do it giving it time to dry. a few coats of high-heat paint and if ya wanna clear it, then a few coats of high-heat clear will do it. i'd re-do it, its the only way you'll get it the way you want...either that, or sand the blemished area's but i'd strip the paint and start over.
to fix the newspaper and blemishes, go buy a spray can of paint stripper and rubber gloves at home hardware, etc. it will peel the paint, then re-do it giving it time to dry. a few coats of high-heat paint and if ya wanna clear it, then a few coats of high-heat clear will do it. i'd re-do it, its the only way you'll get it the way you want...either that, or sand the blemished area's but i'd strip the paint and start over.