DIY: Rear shoe replacement
 15-May-2011, 02:31 PM
#1
Junior Member
Thread Starter

Join Date: Dec 2010
Posts: 3
DIY: Rear shoe replacement
Anybody know a website with a video on how to change the rear brake shoes on a 2004 Civic sedan? Bought some shoes from CT, also bought the spring kit. I've done the pads on the front but never a shoe replacement. Believe a video would be very helpful. Thanks.
 15-May-2011, 02:33 PM
#2
Member

Join Date: Apr 2011
Posts: 43
I'm going to post a link to another forum and hope I don't get in trouble. Sorry mods if this is not accepteable let me know and I won't do it again. It is a great DIY on brake shoe replacement.
http://www.civicforums.com/forums/43...placement.html
http://www.civicforums.com/forums/43...placement.html
21-Sep-2011, 12:20 AM
#3
Junior Member

Join Date: Mar 2011
Posts: 22
Sorry to sound like a dick here.... But in all Honesty you have no business doing the Brakes on you're car if you need an instructional video, or a tutorial.
Brakes are one of the most important components in a vehicle, in if not done correctly they can fail causing an accident, and possibly killing someone, or yourself.
Its Great that you want to be DIY handyman with a car... that's what this Hobby is all about, but fiddling with Brakes when you have no clue in what you're doing is wrong.
Pay a shop the 80 dollars and have it done properly, and know that you'll be safe.
 05-Oct-2011, 11:04 AM
#5

taken from the link above (orig article is by Boilermaker1)
I should be charging about $20 per head to view this. I can't believe its 2005, this car's been out for the better part of 5 years and no one has written this yet.
You need
2 M8x20mm or longer bolts
2 flathead screwdrivers
Needlenose pliers (maybe 2 sets)
OR drum brake spring pliers (eliminates the need for screwdrivers)
1 Honda Brake Shoe Kit - Part Number 43053-S5D-A00 - $47 and change from the dealer
12mm wrench
Phillips head screwdriver
Jack up car, put on stands, remove rear wheels, disengage the parking brake.
Thread the 2 8mm bolts into the drum as shown. Turn 2 revolutions at a time, then switch to the other bolt so the drum comes off straight. At some point the drum will pop loose, just slide it off the studs. Measure the inner diameter of it, it needs to be less than 201mm.... if its not, then buy new drums.

This is your enemy. Look it over.... it needs to all go back together like this. The tube at the top is the wheel cylinder... inspect it for leaks. If its leaking, replace it too.
You should see 2 springs.... a long one at the top, and a short one at the bottom.
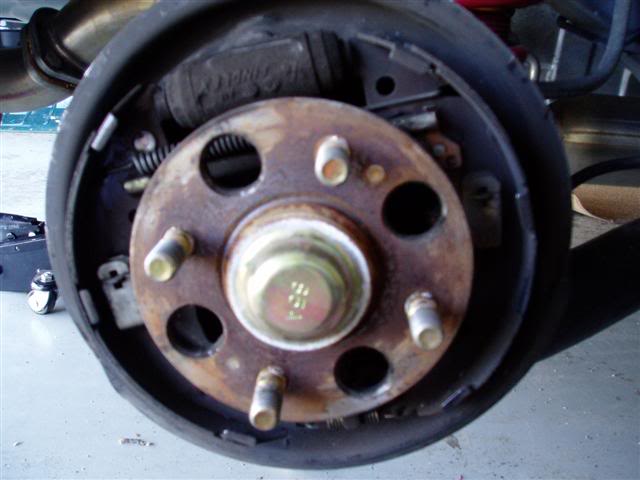
These clips hold the shoes in place. With the needle nose pilers and a screwdriver, depress the spring and turn the pin that holds the shoes in place. There's one per shoe.
Then,
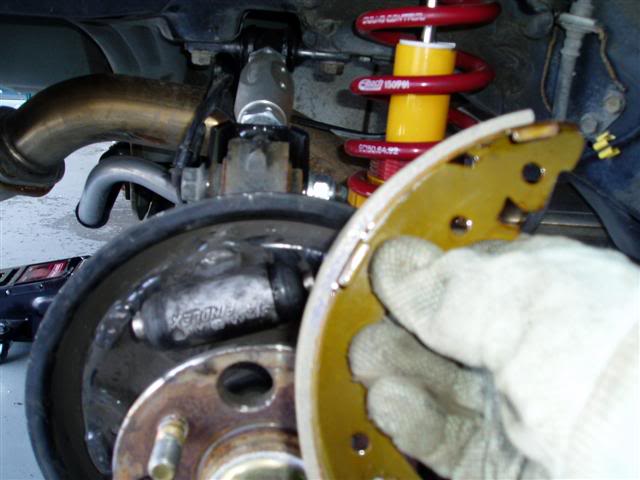
Remove the bottom return spring first, then release the top one. Once you do that, the shoes will be separated and you can remove the front one. Make sure to grab both pieces of the clevis that goes between the 2 shoes (its the rod under the top return spring). The rear shoe will be loose now, but the parking brake cable also needs to be disconnected. Disconnect it from the clip.

Once the rear shoe is out, flip it over, you'll see how the parking brake arm is connected. You need to remove the U clip. I used a dremel and just ground it from the edge in until it came off. If you do this, be careful not to grind the pin.

Old shoe vs. New shoe... I waited too long. You're supposed to replace them long before this happens.

Reassembly
The Honda kit comes with new U clips and retaining pins/springs. This is why I recommend you buy it. If not, you need to buy new U clips. This is the parking brake mechanism. Put the pin through the front side of the shoe (the side you can see when its installed) the put the parking brake arm and wave washer on the back side, then install the U-clip. Squeeze the end together so it doesn't come off.

Assembled

On the front shoe, you need to assemble the self-adjust mechanism. Install the clip then put the spring into the hole like in the picture.

Now... here's the hard, frustrating part. You need to put all this crap back into place. Shorten the clevis by screwing the threaded portion all the way in. You'll notice that one side is missing a tab on it... thats for the parking brake. First, you need to reconnect the parking brake lever to the cable. That will leave the rear shoe hanging in place. Then put it back into its slot in the wheel cylinder. DON'T push hard on it, you'll pop piston for the front shoe out of the cylinder. Then, put the clevis on the front shoe, making sure the self-adjust tab fits in its slot in the clevis fork. Slide the front shoe in place, lining up the clevis in the slot for it in the rear shoe. Hold it there and re-install the top spring (extra hands is good).

Once you got that, and it may take a few tries, reinstall the bottom spring, making sure the shoes are resting behind the tab (if they're in front of it, then they won't pivot and you'll have no braking force), then install the rear spring with the spring behind the shoes

Then reinstall the retainer pins and springs. Magic.... its all done and this pic looks like the one you started with, except the shoes have some lining on them now and they're army green.
Put the drum back on.
Pump the brakes a couple times to reset the self-adjusters. Plan on bleeding the brakes regardless of how good or bad the install goes. Its always a wise idea.
Then re-adjust the parking brake. If you yank it, it probably goes up and doesn't do anything. Remove the 2 phillips head screws that hold the back of the center console in place. Then lift up on the e-brake cover and look down... there's a 12mm nut on that the line the handle is attached to. Release the e-brake and turn it to shorten the line and take slack out of the cable. Pull the e-brake again and try to turn the drums. If they're still turning, you need to tighten more. If they stop, then you're good.
Put the wheels back on. Take the car out.... do 5-10 stops from 40-5 (Don't completely stop), then drive around for a little, then do 5-10 hard stops from 40-5 to bed the shoes and make sure the self-adjusters are fully adjusted. Go easy on them for a little bit, then have at it.
This *looks* easy. In concept it is. I mean... look at it, you don't even need a socket wrench. Its just very frustrating when the springs don't go back on, and its a very tight place to work in. It took me the better part of 3.5-4 hours to do, about equal time on both sides. I had the pages from the Honda manual on hand when I did this.... it only helped for the basics. I had them both opened up at the same time, and basically re-assembled the first one by looking at the second one.
I should be charging about $20 per head to view this. I can't believe its 2005, this car's been out for the better part of 5 years and no one has written this yet.
You need
2 M8x20mm or longer bolts
2 flathead screwdrivers
Needlenose pliers (maybe 2 sets)
OR drum brake spring pliers (eliminates the need for screwdrivers)
1 Honda Brake Shoe Kit - Part Number 43053-S5D-A00 - $47 and change from the dealer
12mm wrench
Phillips head screwdriver
Jack up car, put on stands, remove rear wheels, disengage the parking brake.
Thread the 2 8mm bolts into the drum as shown. Turn 2 revolutions at a time, then switch to the other bolt so the drum comes off straight. At some point the drum will pop loose, just slide it off the studs. Measure the inner diameter of it, it needs to be less than 201mm.... if its not, then buy new drums.
This is your enemy. Look it over.... it needs to all go back together like this. The tube at the top is the wheel cylinder... inspect it for leaks. If its leaking, replace it too.
You should see 2 springs.... a long one at the top, and a short one at the bottom.
These clips hold the shoes in place. With the needle nose pilers and a screwdriver, depress the spring and turn the pin that holds the shoes in place. There's one per shoe.
Then,
Remove the bottom return spring first, then release the top one. Once you do that, the shoes will be separated and you can remove the front one. Make sure to grab both pieces of the clevis that goes between the 2 shoes (its the rod under the top return spring). The rear shoe will be loose now, but the parking brake cable also needs to be disconnected. Disconnect it from the clip.
Once the rear shoe is out, flip it over, you'll see how the parking brake arm is connected. You need to remove the U clip. I used a dremel and just ground it from the edge in until it came off. If you do this, be careful not to grind the pin.
Old shoe vs. New shoe... I waited too long. You're supposed to replace them long before this happens.
Reassembly
The Honda kit comes with new U clips and retaining pins/springs. This is why I recommend you buy it. If not, you need to buy new U clips. This is the parking brake mechanism. Put the pin through the front side of the shoe (the side you can see when its installed) the put the parking brake arm and wave washer on the back side, then install the U-clip. Squeeze the end together so it doesn't come off.
Assembled
On the front shoe, you need to assemble the self-adjust mechanism. Install the clip then put the spring into the hole like in the picture.
Now... here's the hard, frustrating part. You need to put all this crap back into place. Shorten the clevis by screwing the threaded portion all the way in. You'll notice that one side is missing a tab on it... thats for the parking brake. First, you need to reconnect the parking brake lever to the cable. That will leave the rear shoe hanging in place. Then put it back into its slot in the wheel cylinder. DON'T push hard on it, you'll pop piston for the front shoe out of the cylinder. Then, put the clevis on the front shoe, making sure the self-adjust tab fits in its slot in the clevis fork. Slide the front shoe in place, lining up the clevis in the slot for it in the rear shoe. Hold it there and re-install the top spring (extra hands is good).
Once you got that, and it may take a few tries, reinstall the bottom spring, making sure the shoes are resting behind the tab (if they're in front of it, then they won't pivot and you'll have no braking force), then install the rear spring with the spring behind the shoes
Then reinstall the retainer pins and springs. Magic.... its all done and this pic looks like the one you started with, except the shoes have some lining on them now and they're army green.
Put the drum back on.
Pump the brakes a couple times to reset the self-adjusters. Plan on bleeding the brakes regardless of how good or bad the install goes. Its always a wise idea.
Then re-adjust the parking brake. If you yank it, it probably goes up and doesn't do anything. Remove the 2 phillips head screws that hold the back of the center console in place. Then lift up on the e-brake cover and look down... there's a 12mm nut on that the line the handle is attached to. Release the e-brake and turn it to shorten the line and take slack out of the cable. Pull the e-brake again and try to turn the drums. If they're still turning, you need to tighten more. If they stop, then you're good.
Put the wheels back on. Take the car out.... do 5-10 stops from 40-5 (Don't completely stop), then drive around for a little, then do 5-10 hard stops from 40-5 to bed the shoes and make sure the self-adjusters are fully adjusted. Go easy on them for a little bit, then have at it.
This *looks* easy. In concept it is. I mean... look at it, you don't even need a socket wrench. Its just very frustrating when the springs don't go back on, and its a very tight place to work in. It took me the better part of 3.5-4 hours to do, about equal time on both sides. I had the pages from the Honda manual on hand when I did this.... it only helped for the basics. I had them both opened up at the same time, and basically re-assembled the first one by looking at the second one.

Thread
Thread Starter
Forum
Replies
Last Post
Azxster
Brakes - Wheels - Tires
4
16-Jan-2008 09:21 AM
tashi
Honda Civic (+ other) Parts/Accessories for Sale or Trade
5
19-Aug-2005 11:11 PM


