clean up your grounds
 20-Dec-2005, 03:38 PM
#1
Registered User
Thread Starter
Join Date: Sep 2005
Location: Mississauga
Posts: 297
clean up your grounds
this was taken from thezcr.com
Clean Up Your Grounds! - by TheAcidBeaver
Grounds. I'm sure you heard of them, the ever relentless cry of "Check your grounds!" fills the forum. Grounds are important. Why? What are they? Simply put, it's just something that is the end of the line for all the electricity flowing through the car. Often times, the ground IS the car. Other times, the ground is the engine block (which is grounded to the chassis). The reason WHY grounds are so important, and that the quality of grounds is maintained, is simply that if you have poor grounds, or not enough of them, you are choking of the ellectical flow in and about your engine, ECU, lights, etc. This bottleneck is like putting a 1" exhuast on a B16 and trying to rev it to 8500RPM. It's not going to happen. All the sensors on your car are operated or read by electricity or fields generated by electrical flow. If the electrical flow is hampered, your ECU won't be getting information as well as it could, since sensors won't be reading as acurately or as quickly as they otherwise could if you had adequate electrical flow. This is not good for performance, efficiency, and this poor electrical flow can actually CAUSE drivability problems. To sum up: Good grounds are vital to the best engine performance you can possibly get.
Now that you know a little about what grounds are and why they are so important, lets looks at what comprises a good ground. A good grounds is composed of three parts: The device or part being grounded, the object to which the device will be connected, and the connection between the two. There are three grounds on the stock engine: The thermostat housing ground (where many of the sensors and I believe the ECU is grounded), the main battery-to-body-to-tranny ground, and the valve-cover-to-radiator-support ground. Many of the various problems people encounter with engine swaps are simply forgetting one or more of the ground connections listed. These few wires cause more trouble and headaches than many other more difficult swap procedures because they are simply forgotten in the hub-bub of the swap. By the time most people get around to swaping, the wires the comprise the main battery-to-body-to-tranny ground and the valve-cover-to-radiator-support ground, are truly shades of what they once were. These SHOULD be replaced when doing a swap. The added expense is minimal compared to the headaches one can encounter when dealing with unsatisfactory performance from a swap.
Many times with an engine swap, you are putting in a more powerful engine, one capable of reving higher and just being more powerful. I have decided that upgrading your grounds is neccessary at that point. Sensors need to be more accurate, the ignition coil will be using more electricity to ignite the air and fuel mixture in the cylinders as it it being cycled so much faster at higher RPMs, the ECU is getting more of a workout with the added RPM and rapidity it brings. Good grounds that will help your engine are solid grounds. They are wires and connections that allow maximum electircal flow and minimum resistance. The stock wires are adequate at the start of the life of the car, but they do fall well short of what you need them to do, especially after an aftermarket stereo install, a bigger fuel pump, extra sensors and gauges, etc. For the wire end of this, bigger is better. The larger the cross-sectional area that a wire has the more current the wire is capable of conducting. (That's a gross generalization, but it's an effective one.)
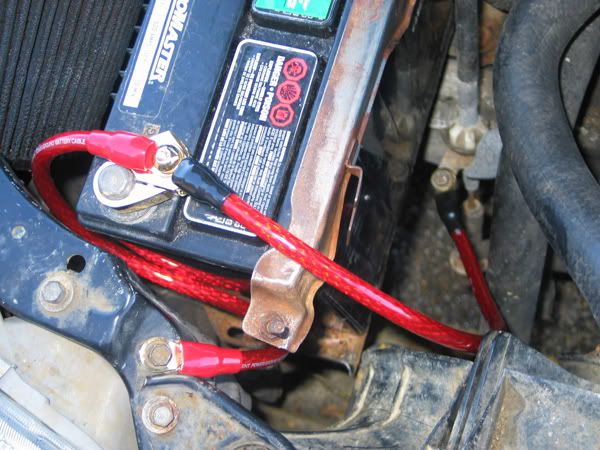
So, start of with selecting a larger than stock wire for your ground. I procured mine from a local stereo installer. It is high quality, uber-stranded, well insulated (resistant to oil, gas, heat, etc.), and just plain nice looking. I went slightly overkill on the main battery-to-body ground by using 4 gauge (I had some left over from installing my sub amp), and 8 guage for the the battery-to-tranny ground and the valve-cover-to-radiator-support. I also purchased a gold-plated brass negative battery terminal from Radio shack, and if you can still find them at your local 'Shack, they should be on clearance since they are dropping their car audio lines. It was about $8 (US) if I remember correctly, roughly half price. This little jammy rocks! It lets you hook up 2 up-to-8 gauge wires (If I remember correctly) and one 4 gauge wire. The wires are attached by means of compression bolts. You use a hex tool of the appropriate size to squeeze the wire until it squishes to fill all the available space in the hole that it is inserted into. This provides a VERY good connection.
Here is a picture that shows the connections at the battery:

Notice the angle that is installed. This is to avoid hitting the hood. You may have to play with it to get it to fit correctly. Just a word, it's NOT the greatest for corosion resistance, so if you are concerned about apperances, you may want to opt for something a bit more expensive and better quality. For the money, I won't complain. It functions perfectly and looks better (even in it's slightly green state) than the stock wiring.
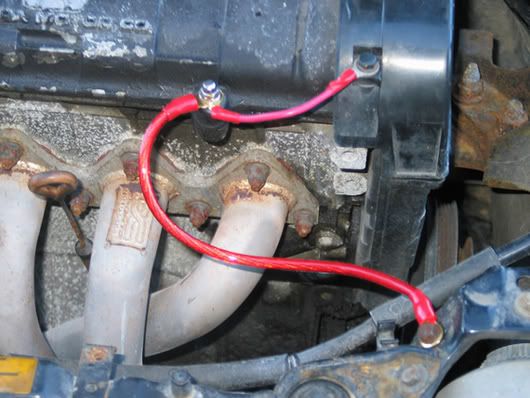
This next picture shows the valve-cover-to-radiator-support ground:

This is an 8 gauge wire with gold plated terminal ends (I changed them from the standard ones shown in the picture). The terminal ends were crimped on using a pair of linesman's pliers to achive the optimal amount of contact. It is really a myth that soldering something is the best way to achieve the best contact, as most solders are not chosen for there conductivity, rather their ability to melt at low temperatures are the main reason for selection. (This is NOT an excuse to use butt connectors.
If you use butt connectors for anything in your car, you should be kicked swiftly and repeatedly several times for each connection made with one of those infernal things. You still need to solder connections that you make in say, the wiring harness.) Contact is the key here. Having no space left between the terminal and the wire strands also ensures that the conection will take MUCH longer to corode, because air and water are not allowed to enter the joint, which in itself further deteriorates the quality of the connection. After the terminals were crimped on, I used GB brand shrink wrap (from Home Despot) to make the ends look nice and neat. (Writer's note: Again, I used shrink wrap when I changed the teminals. And, I DESPISE the shrink wrap the 'Shack sells. The ends split, it melts into unusable slag much to easily, looks like CRAP after it's shrunk, and doesn't shrink as well as the GB brand stuff.) As you might notice from the picture, the ground from the timing belt cover is not there. There is one there stock, and I will be rectifying this in time, as the cover should be grounded. The timing belt moving through air inside the cover generates a static charge that should be disipated.
One VERY important thing to remember: SLACK! You NEEEEEEED to leave a couple inches of slack left in the wire, because you engine moves, especially with stock or worn stock mounts. You'd be suprised how many people forget something this simple!
Now, did I notice anything after taking the time (less than half an hour) to do this? Quite simply, yes. The car starts easier, idles smoother and runs better. I haven't noticed any change in the gas milage, but the overall benefits of smoothness while driving, and slightly better throttle control were worth it.
Other points to ground and things to do:
It has been brought to my attention that DSM cars came stock with a ground on The O2 sensor housing, which is supposed to make the O2 sensor read better. This would make sense. To do this, you'd need some wire with high temp insulation and can the shrink wrap on the ends. I'd simply weld a nut onto the housing/downpipe/header near the O2 sensor and run the wire to the nearest convenient bolt hole on the body. (Remember to leave some slack!)
Since the Thermostat housing ground has quite a few wire run to is, and most of them are in the harness, they don't usually deteriorate. However, it would be a good ideal to take some sandpaper (or your dremel with a wire-wheel brush and appropriate eye protection) and clean the terminal and the housing mounting point. Oxides inhibit electical conductivity. Aluminum oxidizes very easily. Keep it clean, and if you'd like, you can apply some vaseline over the connection to prevent corosion.
There, that explains what I've done and most of the reasons why. If you have any additional information, pictures, feed back, complaints, addenda, corrections, mad ravings about my dental hygiene, etc., please feel free to email me at this address: theacidbeaver@yahoo.com.
Thanks for reading my article! =�
Clean Up Your Grounds! - by TheAcidBeaver
Grounds. I'm sure you heard of them, the ever relentless cry of "Check your grounds!" fills the forum. Grounds are important. Why? What are they? Simply put, it's just something that is the end of the line for all the electricity flowing through the car. Often times, the ground IS the car. Other times, the ground is the engine block (which is grounded to the chassis). The reason WHY grounds are so important, and that the quality of grounds is maintained, is simply that if you have poor grounds, or not enough of them, you are choking of the ellectical flow in and about your engine, ECU, lights, etc. This bottleneck is like putting a 1" exhuast on a B16 and trying to rev it to 8500RPM. It's not going to happen. All the sensors on your car are operated or read by electricity or fields generated by electrical flow. If the electrical flow is hampered, your ECU won't be getting information as well as it could, since sensors won't be reading as acurately or as quickly as they otherwise could if you had adequate electrical flow. This is not good for performance, efficiency, and this poor electrical flow can actually CAUSE drivability problems. To sum up: Good grounds are vital to the best engine performance you can possibly get.
Now that you know a little about what grounds are and why they are so important, lets looks at what comprises a good ground. A good grounds is composed of three parts: The device or part being grounded, the object to which the device will be connected, and the connection between the two. There are three grounds on the stock engine: The thermostat housing ground (where many of the sensors and I believe the ECU is grounded), the main battery-to-body-to-tranny ground, and the valve-cover-to-radiator-support ground. Many of the various problems people encounter with engine swaps are simply forgetting one or more of the ground connections listed. These few wires cause more trouble and headaches than many other more difficult swap procedures because they are simply forgotten in the hub-bub of the swap. By the time most people get around to swaping, the wires the comprise the main battery-to-body-to-tranny ground and the valve-cover-to-radiator-support ground, are truly shades of what they once were. These SHOULD be replaced when doing a swap. The added expense is minimal compared to the headaches one can encounter when dealing with unsatisfactory performance from a swap.
Many times with an engine swap, you are putting in a more powerful engine, one capable of reving higher and just being more powerful. I have decided that upgrading your grounds is neccessary at that point. Sensors need to be more accurate, the ignition coil will be using more electricity to ignite the air and fuel mixture in the cylinders as it it being cycled so much faster at higher RPMs, the ECU is getting more of a workout with the added RPM and rapidity it brings. Good grounds that will help your engine are solid grounds. They are wires and connections that allow maximum electircal flow and minimum resistance. The stock wires are adequate at the start of the life of the car, but they do fall well short of what you need them to do, especially after an aftermarket stereo install, a bigger fuel pump, extra sensors and gauges, etc. For the wire end of this, bigger is better. The larger the cross-sectional area that a wire has the more current the wire is capable of conducting. (That's a gross generalization, but it's an effective one.)
So, start of with selecting a larger than stock wire for your ground. I procured mine from a local stereo installer. It is high quality, uber-stranded, well insulated (resistant to oil, gas, heat, etc.), and just plain nice looking. I went slightly overkill on the main battery-to-body ground by using 4 gauge (I had some left over from installing my sub amp), and 8 guage for the the battery-to-tranny ground and the valve-cover-to-radiator-support. I also purchased a gold-plated brass negative battery terminal from Radio shack, and if you can still find them at your local 'Shack, they should be on clearance since they are dropping their car audio lines. It was about $8 (US) if I remember correctly, roughly half price. This little jammy rocks! It lets you hook up 2 up-to-8 gauge wires (If I remember correctly) and one 4 gauge wire. The wires are attached by means of compression bolts. You use a hex tool of the appropriate size to squeeze the wire until it squishes to fill all the available space in the hole that it is inserted into. This provides a VERY good connection.
Here is a picture that shows the connections at the battery:
Notice the angle that is installed. This is to avoid hitting the hood. You may have to play with it to get it to fit correctly. Just a word, it's NOT the greatest for corosion resistance, so if you are concerned about apperances, you may want to opt for something a bit more expensive and better quality. For the money, I won't complain. It functions perfectly and looks better (even in it's slightly green state) than the stock wiring.
This next picture shows the valve-cover-to-radiator-support ground:
This is an 8 gauge wire with gold plated terminal ends (I changed them from the standard ones shown in the picture). The terminal ends were crimped on using a pair of linesman's pliers to achive the optimal amount of contact. It is really a myth that soldering something is the best way to achieve the best contact, as most solders are not chosen for there conductivity, rather their ability to melt at low temperatures are the main reason for selection. (This is NOT an excuse to use butt connectors.
If you use butt connectors for anything in your car, you should be kicked swiftly and repeatedly several times for each connection made with one of those infernal things. You still need to solder connections that you make in say, the wiring harness.) Contact is the key here. Having no space left between the terminal and the wire strands also ensures that the conection will take MUCH longer to corode, because air and water are not allowed to enter the joint, which in itself further deteriorates the quality of the connection. After the terminals were crimped on, I used GB brand shrink wrap (from Home Despot) to make the ends look nice and neat. (Writer's note: Again, I used shrink wrap when I changed the teminals. And, I DESPISE the shrink wrap the 'Shack sells. The ends split, it melts into unusable slag much to easily, looks like CRAP after it's shrunk, and doesn't shrink as well as the GB brand stuff.) As you might notice from the picture, the ground from the timing belt cover is not there. There is one there stock, and I will be rectifying this in time, as the cover should be grounded. The timing belt moving through air inside the cover generates a static charge that should be disipated.
One VERY important thing to remember: SLACK! You NEEEEEEED to leave a couple inches of slack left in the wire, because you engine moves, especially with stock or worn stock mounts. You'd be suprised how many people forget something this simple!
Now, did I notice anything after taking the time (less than half an hour) to do this? Quite simply, yes. The car starts easier, idles smoother and runs better. I haven't noticed any change in the gas milage, but the overall benefits of smoothness while driving, and slightly better throttle control were worth it.
Other points to ground and things to do:
It has been brought to my attention that DSM cars came stock with a ground on The O2 sensor housing, which is supposed to make the O2 sensor read better. This would make sense. To do this, you'd need some wire with high temp insulation and can the shrink wrap on the ends. I'd simply weld a nut onto the housing/downpipe/header near the O2 sensor and run the wire to the nearest convenient bolt hole on the body. (Remember to leave some slack!)
Since the Thermostat housing ground has quite a few wire run to is, and most of them are in the harness, they don't usually deteriorate. However, it would be a good ideal to take some sandpaper (or your dremel with a wire-wheel brush and appropriate eye protection) and clean the terminal and the housing mounting point. Oxides inhibit electical conductivity. Aluminum oxidizes very easily. Keep it clean, and if you'd like, you can apply some vaseline over the connection to prevent corosion.
There, that explains what I've done and most of the reasons why. If you have any additional information, pictures, feed back, complaints, addenda, corrections, mad ravings about my dental hygiene, etc., please feel free to email me at this address: theacidbeaver@yahoo.com.
Thanks for reading my article! =�


 06-Jan-2006, 02:36 PM
#10
Registered User

Join Date: Oct 2005
Location: T.O.
Posts: 599
Excellent D.I.Y, u guys remember the alternator problem i posted, well it wasnt the alternator. It was the valve cover-radiator bracket ground. Where can I get the terminals for the valve cover-radiator bracket???and where is another place i can get terminals for the battery??
17-Jan-2006, 01:03 PM
#12
Registered User
Thread Starter
Join Date: Sep 2005
Location: Mississauga
Posts: 297
i've tried crappy tire and the source (radioshack) with no luck, the terminals they sell are way too thin and flimsy. and they didn't have any wire thicker than 10 gauge
im gonna check partsource and princess auto this week.
im gonna check partsource and princess auto this week.
17-Jan-2006, 04:56 PM
#13
Registered User

Join Date: Jun 2004
Location: Canada
Posts: 1,102
Originally posted by angryasian
i've tried crappy tire and the source (radioshack) with no luck, the terminals they sell are way too thin and flimsy. and they didn't have any wire thicker than 10 gauge
im gonna check partsource and princess auto this week.
i've tried crappy tire and the source (radioshack) with no luck, the terminals they sell are way too thin and flimsy. and they didn't have any wire thicker than 10 gauge
im gonna check partsource and princess auto this week.
I would suggest going to an audio shop, they are bound to have them.
BTW: What stud size are you going to get? I think 1/2" is good or no?
BTW2: I'm gonna do this in spring/summer man, its fricikng cold!!!
19-Jan-2006, 09:27 PM
#15
Registered User
Thread Starter
Join Date: Sep 2005
Location: Mississauga
Posts: 297
got the parts at best buy
2' - 4ga wire
2' - 8ga wire
4 - 4ga gold plated ring terminals
4 - 8ga gold plated ring terminals
gold plated terminal for negative pole on battery
came to just under $50
2' - 4ga wire
2' - 8ga wire
4 - 4ga gold plated ring terminals
4 - 8ga gold plated ring terminals
gold plated terminal for negative pole on battery
came to just under $50
20-Jan-2006, 01:31 PM
#16
Registered User
Join Date: Jun 2004
Location: Canada
Posts: 1,102
Originally posted by angryasian
got the parts at best buy
2' - 4ga wire
2' - 8ga wire
4 - 4ga gold plated ring terminals
4 - 8ga gold plated ring terminals
gold plated terminal for negative pole on battery
came to just under $50
got the parts at best buy
2' - 4ga wire
2' - 8ga wire
4 - 4ga gold plated ring terminals
4 - 8ga gold plated ring terminals
gold plated terminal for negative pole on battery
came to just under $50
Can you pleasr take some pics for us?
 20-Jan-2006, 01:38 PM
#17
Registered User
Join Date: Jun 2004
Location: Canada
Posts: 1,102
Originally posted by angryasian
got the parts at best buy
2' - 4ga wire
2' - 8ga wire
4 - 4ga gold plated ring terminals
4 - 8ga gold plated ring terminals
gold plated terminal for negative pole on battery
came to just under $50
got the parts at best buy
2' - 4ga wire
2' - 8ga wire
4 - 4ga gold plated ring terminals
4 - 8ga gold plated ring terminals
gold plated terminal for negative pole on battery
came to just under $50
Did Best Buy have various sizes up to 1/0?
You shoulda bought the battery terminal I was selling
 20-Jan-2006, 09:36 PM
#18
Registered User
Thread Starter
Join Date: Sep 2005
Location: Mississauga
Posts: 297
they only had 4 guage and 8 gauge i beleive and they were all 5/16"
pack of 4 x 4ga was 6.99, pack of 4 x 8ga was 4.99
damn i didn't know you were sellin a battery terminal, the one i got was 19.99.
im gonna try install it all tomorow, so i'll take pics then.
pack of 4 x 4ga was 6.99, pack of 4 x 8ga was 4.99
damn i didn't know you were sellin a battery terminal, the one i got was 19.99.
im gonna try install it all tomorow, so i'll take pics then.
20-Jan-2006, 10:34 PM
#19
Registered User
Join Date: Mar 2004
Posts: 3,266
i'd also recommend sanding the corrosion and other crap that has stuck itself to the battery terminals with a wire brush. then clean up the contacts with the wire brush as well. apply some dielectric grease and ur golden