DIY EK Rear Suspension Install - Tokico
 10-Aug-2009, 09:15 AM
#1
Registered User
Thread Starter

Join Date: Apr 2002
Posts: 65
DIY EK Rear Suspension Install - Tokico
I've posted another DIY on my blog, this time about the rear EK suspension install. I've benefited greatly from some of the DIYs on this site so here's a small gesture of contributing to the TCC community.
DIY Honda Civic EK Rear Suspension Install I've quoted everything below so you don't have to click through. Larger pictures of each of these are linked there.
DIY Honda Civic EK Rear Suspension Install I've quoted everything below so you don't have to click through. Larger pictures of each of these are linked there.
WARNING: This is for informational purposes only. Working on your car may be dangerous and may result in injury or death. The author accepts no liability for any injury or death, intentional or unintentional, resulting from this guide. You have been warned, proceed at your own personal risk.
Tools:
Lots � make sure you have lots. Any less and you�ll fail. Really.
Ok how about a 1/2″ or 3/8″ drive rachet and socket set with 10mm, 12mm, and 14mm sockets at a minimum. A 12mm box wrench, Allen Keys, a hammer, long lever (can�t hurt), a can of WD-40 or Liquid Wrench, utility knife, white lithium grease, clean rags, engine degreaser, and of course a good floor jack, jackstands and wheel chocks. I�m probably forgetting some stuff (like a johnson/breaker bar, trim removal tool, flathead screwdriver etc.) so that�s why I said have a bunch of tools available to you.
Get Started:
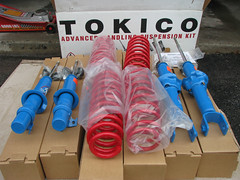
First things first, get yourself a set of shocks/struts and springs for your EK. Mine�s a 2000 Si Coupe so I bought a set of Tokico Blue non-adjustable shocks and Tokico Red springs (which are apparently just rebranded Eibach Pro-Kit springs). Why did I do this instead of getting Koni Yellow full adjustables with Ground Control coilovers? Or even a set of Tokico adjustable shocks so I could dial in rebound? Both good questions that are easily answered with one word, �wife�.
So why is this only about the rear suspension? Well the fronts are very easy to install and have been covered many times in several tutorials. I personally can confirm that the install process for the fronts are identical for a 97-02 Prelude (5th Gen), 96-00 EK Civic, 4th Gen Prelude and the CRX. I�m sure that Honda uses the same suspension geometry for the front on many other of their models but I�m not sure of all. I�m quite certain that this tutorial applies to other Honda like the CRX, Acura 1.6EL, the EG and all EK Civics.
Here are a few articles on the front install for your reference:
DIY: Coilovers + OMNI camber kit � TCC Forums
EK Honda Civic Coilovers Install � JDM Universe.com (has some information about the rears)
NTPOG 5th Gen (Prelude) Spring Installation
Lowering springs/shocks install with pics on 5th Gen
EK Rear Suspension Install
SAFETY FIRST!! Make sure your EK is parked on a flat and level surface, preferable concrete. Loosen your wheel lug nuts but do not remove them. Now, be careful to jack up your car carefully and USE JACKSTANDS! DO NOT leave it on the jack alone. Hydraulic jacks do fail so you must use jackstands. Jack from the rear tow hook and place the jack stands on the side rear jack points in front of the rear wheel wells. Remove the wheels.
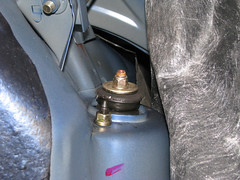
Open your trunk and empty it of any items, you want to have it down to just the carpet. You need to pull back the carpet on the sides to gain access to the shock towers. There�s a few plastic tabs that need to be removed to free the carpet from the sides. There�s 2 kinds, one that you have to press the centre and it will pop in and allow you take them out and another that you just pull straight out. Use a trim tool if you have one, or a flat head screwdriver otherwise. Once the carpet is free pull it back so you can see the top of the shock tower as in the picture. The shock is held in place by 2 14mm (I think, could be 12mm) nuts. You want to loosen those 2 nuts (use a deep socket) but leave the bolts threaded a bit. This is so the shock won�t fall once it�s loose.
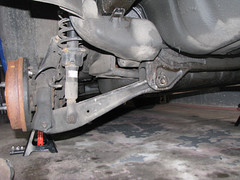
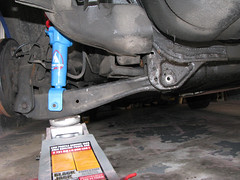
Now look under your car and you will see a clear view of the suspension. Pictured is the left side which is easier to view because the muffler is not in the way. The bottom of the rear shock is connected to the lower control arm by a single 14mm bolt. The lower control arm connects to the rear suspension knuckle with a 14mm bolt (to the left of the shock bolt) and the subframe also with a 14mm bolt (to the right).
Here is where the unlucky people have the most problems. Each of these 14mm bolts have the potential for the heads to break off if you apply too much torque. This happens because at each of these locations the bolt goes through a bushing in the lower control arm and over time becomes rusted, seized and fused to the inside of that bushing. This prevents loosening and removing of the bolts. You can attempt to soak the bolts on both sides with penetrating fluid (WD-40, Liquid Wrench, etc.) repeatedly and letting it sit. Or I�ve heard reports of using a modest amount of heat and cold (torch and water) to shock the bolts and break the rust. The risk with heat is that the rubber bushings can melt so be careful. If you are unable to free them the only option left is to drill out the bolts and replace the lower control arms with OEMs or aftermarkets (like Blox or Skunk2).
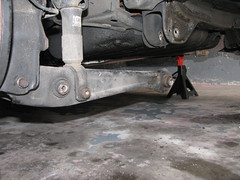
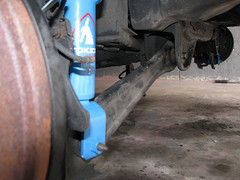
Assuming you can get the bolts loosened without incident I recommend removing the inner one connected to the subframe and the shock bottom as pictured. As you can see the control arm will free from the subframe and be pushed down by the shock. The next step is to remote the 2 nuts holding the shock to the shock tower (in the trunk) to free the shock for removal. Slide the bottom of the shock toward the subframe (centre of the car) and this will allow you to remove the shock completely from the car. Here�s a picture to give you an idea, click through as I don�t want to waste the space here.
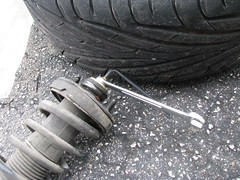
Now that the shock is free from the car you want to disassemble it. You may have been told that you need a spring compressor and although useful it�s not an absolute must. You�ll need the appropriate sized metric Allen Key (I�m not sure which one I just tried a bunch until one fit) and a 12mm (I think) box wrench.
Here�s a trick I learned from my buddy Grant from the TPC to prevent the nut from shooting out like a bullet and maiming someone. WEAR EYE PROTECTION just in case. Wedge the Allen Key against your tire, step on the shock assembly to keep it from moving and loosen the nut until it comes off. It�ll make a loud BOING sound and the shock will move back slightly but the top nut won�t become a lethal projectile.
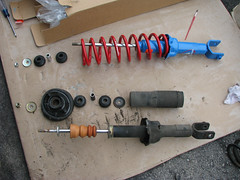
Once that nut is off the entire assembly can come out. You only need the top mount (or crown), inner rubber top bushing/gasket, the bump stop and the rubber boot. As you can see here is the breakdown of the stock shock assembly and the almost complete Tokico assembly. The thing I like about working on your own car is that you can take your time to clean up things and go beyond the call of duty so everything is perfect (this IS your car). This is a chance to degrease the top mount and get that old caked on grime and old grease removed, regrease the inner rubber top bushing with white lithium grease and clean up the rubber boot. You don�t have to but I figured I�d never get a chance to do it again so why not spend the extra 10 minutes and make sure things are clean.
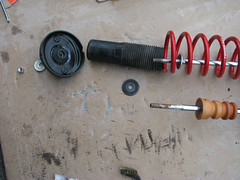
Cut the bumpstop down by half at least. I didn�t cut the rubber boot as it�s flexible and will destroy itself without incident if it gets in the way (which it hasn�t so far). Line up everything to be assembled on the Tokico assembly. Notice that I didn�t move the bumpstop over yet, you must do that as you do not want the shock to bottom out on itself and cause damage. This could happen if you hit a big pothole, speedbump or you�re in a turn and loading up the suspension. Assemble it all together and use your Allen Key and box wrench to tighten it up good and tight. You might have some trouble getting the spring compressed enough to thread the top nut back onto the shock assembly. Before you panic, since the new spring is shorter than your OEM one all you need is a friend to help you. Position the assembly vertically with the bottom resting on the ground. Grip the top mount and use all your weight to compress the spring (it won�t take much). Then your friend simply has to thread the nut a few turns finger tight so it won�t fly off when you allow the spring to rebound.
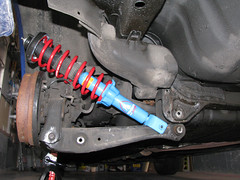
Now that you have your Tokico shock assembly together you�re going to use the reverse procedure to get it onto your car. Position it as pictured with the bottom of the shock on the lower control arm pointed toward the centre under the rear subframe and the top resting on top of the drum brake. Ensure that the nut that�s welded on the bottom of the shock is positioned towards the back as pictured. Slide the shock bottom along the lower control arm towards the drum brake and position the top up to the shock tower so the bolts line up with the shock tower holes. Back in the trunk and finger tighten the 2 nuts on the top mount.
Now you�re going to need to line up the shock bottom with the lower control arm bushing. Before you thread the bolt through you�ll want to use the aluminum spacers that come with the Tokico kit. I didn�t take a picture but it is required. I highly recommend you use anti-seize compound on the bolt then thread the bolt and tighten it up good. I don�t know what the torque spec is but I usually go very hard with my 1/2″ drive ratchet.
Now use your floor jack under the lower control arm and jack it up to compress the shock and spring assembly. That will allow you to line up the holes for the inner subframe. Anti-seize the bolt and thread it through the inner subframe. Tighten it up and once it�s done it should look like this. Don�t forget to tighten the top nuts in the trunk.
The other side is essentially the same so follow the same steps for that. Put your wheels back on, remembering to torque them up to spec with a torque wrench and pat yourself on the back for saving $200-400 in labour charges in getting your own suspension into your EK!
Tools:
Lots � make sure you have lots. Any less and you�ll fail. Really.
Ok how about a 1/2″ or 3/8″ drive rachet and socket set with 10mm, 12mm, and 14mm sockets at a minimum. A 12mm box wrench, Allen Keys, a hammer, long lever (can�t hurt), a can of WD-40 or Liquid Wrench, utility knife, white lithium grease, clean rags, engine degreaser, and of course a good floor jack, jackstands and wheel chocks. I�m probably forgetting some stuff (like a johnson/breaker bar, trim removal tool, flathead screwdriver etc.) so that�s why I said have a bunch of tools available to you.
Get Started:
First things first, get yourself a set of shocks/struts and springs for your EK. Mine�s a 2000 Si Coupe so I bought a set of Tokico Blue non-adjustable shocks and Tokico Red springs (which are apparently just rebranded Eibach Pro-Kit springs). Why did I do this instead of getting Koni Yellow full adjustables with Ground Control coilovers? Or even a set of Tokico adjustable shocks so I could dial in rebound? Both good questions that are easily answered with one word, �wife�.
So why is this only about the rear suspension? Well the fronts are very easy to install and have been covered many times in several tutorials. I personally can confirm that the install process for the fronts are identical for a 97-02 Prelude (5th Gen), 96-00 EK Civic, 4th Gen Prelude and the CRX. I�m sure that Honda uses the same suspension geometry for the front on many other of their models but I�m not sure of all. I�m quite certain that this tutorial applies to other Honda like the CRX, Acura 1.6EL, the EG and all EK Civics.
Here are a few articles on the front install for your reference:
DIY: Coilovers + OMNI camber kit � TCC Forums
EK Honda Civic Coilovers Install � JDM Universe.com (has some information about the rears)
NTPOG 5th Gen (Prelude) Spring Installation
Lowering springs/shocks install with pics on 5th Gen
EK Rear Suspension Install
SAFETY FIRST!! Make sure your EK is parked on a flat and level surface, preferable concrete. Loosen your wheel lug nuts but do not remove them. Now, be careful to jack up your car carefully and USE JACKSTANDS! DO NOT leave it on the jack alone. Hydraulic jacks do fail so you must use jackstands. Jack from the rear tow hook and place the jack stands on the side rear jack points in front of the rear wheel wells. Remove the wheels.
Open your trunk and empty it of any items, you want to have it down to just the carpet. You need to pull back the carpet on the sides to gain access to the shock towers. There�s a few plastic tabs that need to be removed to free the carpet from the sides. There�s 2 kinds, one that you have to press the centre and it will pop in and allow you take them out and another that you just pull straight out. Use a trim tool if you have one, or a flat head screwdriver otherwise. Once the carpet is free pull it back so you can see the top of the shock tower as in the picture. The shock is held in place by 2 14mm (I think, could be 12mm) nuts. You want to loosen those 2 nuts (use a deep socket) but leave the bolts threaded a bit. This is so the shock won�t fall once it�s loose.
Now look under your car and you will see a clear view of the suspension. Pictured is the left side which is easier to view because the muffler is not in the way. The bottom of the rear shock is connected to the lower control arm by a single 14mm bolt. The lower control arm connects to the rear suspension knuckle with a 14mm bolt (to the left of the shock bolt) and the subframe also with a 14mm bolt (to the right).
Here is where the unlucky people have the most problems. Each of these 14mm bolts have the potential for the heads to break off if you apply too much torque. This happens because at each of these locations the bolt goes through a bushing in the lower control arm and over time becomes rusted, seized and fused to the inside of that bushing. This prevents loosening and removing of the bolts. You can attempt to soak the bolts on both sides with penetrating fluid (WD-40, Liquid Wrench, etc.) repeatedly and letting it sit. Or I�ve heard reports of using a modest amount of heat and cold (torch and water) to shock the bolts and break the rust. The risk with heat is that the rubber bushings can melt so be careful. If you are unable to free them the only option left is to drill out the bolts and replace the lower control arms with OEMs or aftermarkets (like Blox or Skunk2).
Assuming you can get the bolts loosened without incident I recommend removing the inner one connected to the subframe and the shock bottom as pictured. As you can see the control arm will free from the subframe and be pushed down by the shock. The next step is to remote the 2 nuts holding the shock to the shock tower (in the trunk) to free the shock for removal. Slide the bottom of the shock toward the subframe (centre of the car) and this will allow you to remove the shock completely from the car. Here�s a picture to give you an idea, click through as I don�t want to waste the space here.
Now that the shock is free from the car you want to disassemble it. You may have been told that you need a spring compressor and although useful it�s not an absolute must. You�ll need the appropriate sized metric Allen Key (I�m not sure which one I just tried a bunch until one fit) and a 12mm (I think) box wrench.
Here�s a trick I learned from my buddy Grant from the TPC to prevent the nut from shooting out like a bullet and maiming someone. WEAR EYE PROTECTION just in case. Wedge the Allen Key against your tire, step on the shock assembly to keep it from moving and loosen the nut until it comes off. It�ll make a loud BOING sound and the shock will move back slightly but the top nut won�t become a lethal projectile.
Once that nut is off the entire assembly can come out. You only need the top mount (or crown), inner rubber top bushing/gasket, the bump stop and the rubber boot. As you can see here is the breakdown of the stock shock assembly and the almost complete Tokico assembly. The thing I like about working on your own car is that you can take your time to clean up things and go beyond the call of duty so everything is perfect (this IS your car). This is a chance to degrease the top mount and get that old caked on grime and old grease removed, regrease the inner rubber top bushing with white lithium grease and clean up the rubber boot. You don�t have to but I figured I�d never get a chance to do it again so why not spend the extra 10 minutes and make sure things are clean.
Cut the bumpstop down by half at least. I didn�t cut the rubber boot as it�s flexible and will destroy itself without incident if it gets in the way (which it hasn�t so far). Line up everything to be assembled on the Tokico assembly. Notice that I didn�t move the bumpstop over yet, you must do that as you do not want the shock to bottom out on itself and cause damage. This could happen if you hit a big pothole, speedbump or you�re in a turn and loading up the suspension. Assemble it all together and use your Allen Key and box wrench to tighten it up good and tight. You might have some trouble getting the spring compressed enough to thread the top nut back onto the shock assembly. Before you panic, since the new spring is shorter than your OEM one all you need is a friend to help you. Position the assembly vertically with the bottom resting on the ground. Grip the top mount and use all your weight to compress the spring (it won�t take much). Then your friend simply has to thread the nut a few turns finger tight so it won�t fly off when you allow the spring to rebound.
Now that you have your Tokico shock assembly together you�re going to use the reverse procedure to get it onto your car. Position it as pictured with the bottom of the shock on the lower control arm pointed toward the centre under the rear subframe and the top resting on top of the drum brake. Ensure that the nut that�s welded on the bottom of the shock is positioned towards the back as pictured. Slide the shock bottom along the lower control arm towards the drum brake and position the top up to the shock tower so the bolts line up with the shock tower holes. Back in the trunk and finger tighten the 2 nuts on the top mount.
Now you�re going to need to line up the shock bottom with the lower control arm bushing. Before you thread the bolt through you�ll want to use the aluminum spacers that come with the Tokico kit. I didn�t take a picture but it is required. I highly recommend you use anti-seize compound on the bolt then thread the bolt and tighten it up good. I don�t know what the torque spec is but I usually go very hard with my 1/2″ drive ratchet.
Now use your floor jack under the lower control arm and jack it up to compress the shock and spring assembly. That will allow you to line up the holes for the inner subframe. Anti-seize the bolt and thread it through the inner subframe. Tighten it up and once it�s done it should look like this. Don�t forget to tighten the top nuts in the trunk.
The other side is essentially the same so follow the same steps for that. Put your wheels back on, remembering to torque them up to spec with a torque wrench and pat yourself on the back for saving $200-400 in labour charges in getting your own suspension into your EK!
 20-Aug-2009, 09:51 AM
#2
Registered User
Thread Starter
Join Date: Apr 2002
Posts: 65
Updated with Review and Videos
I've updated this DIY with a review of the Tokico Blue Shocks and Red Springs in the same post.
Track Videos are in the post.
Tokico Blue Shocks & Red Springs Review
Now that I�ve been driving on this combination for the past 2 or so months here is a brief review. For street duty, this is a great product. I�d say it�s 95% stock comfort, so over bumps, imperfect roads, railroad tracks and potholes it behaves almost the same as stock. The drop is very subtle with about 2-3 fingers all around. The fronts sit a little higher than the rears but I suspect it will settle down over time. No noise and no negative impact to driveability. And as you expect it corners with far less body roll than stock but cannot be compared to a true coilover setup.
This past weekend I took it to Mosport DDT for some hot lapping and found that the combination of this suspension and my EP3 seats result in a consistent 1-2 second difference in lap times over OEM suspension. It was a warmer day this time so the tires would be warmer and track hotter, but I was carrying a passenger this time and heat makes the engine work less efficiently. I did receive feedback from a guy following me that there was still a LOT of body roll.
All in all, the Tokico�s are a good buy for my purposes as my wife and I daily drive the Civic. They�re perfect for a mildly dropped look and a well mated shock to spring-rate combination for street duty. For the track they are passable � barely. Think of these as OEM-like replacements with a 1″ drop.

Thread
Thread Starter
Forum
Replies
Last Post
blak_lude
Custom Honda Civic Exterior - Lighting
1
27-Apr-2010 12:33 AM
imported_tamalsaccord
Honda Civic (+ other) Parts/Accessories for Sale or Trade
7
29-Jun-2005 11:25 PM
imported_Mikeye
Honda Civic Performance - JDM Discussion
25
18-Apr-2005 03:03 AM
imported_viper
Honda Civic (+ other) Parts/Accessories for Sale or Trade
1
09-Sep-2004 09:39 PM


